Pages

Saturday, August 4, 2012

Textures

So I'm discovering that making textures takes a LONG time. this is especially true if you are just using a mouse to do all of your drawing.
Previously I was able to, if undisturbed, to make at MOST 2 textures a day.
It's worth mentioning that all of the textures I make are quite large; most are 1024 x 1024 - I can always, easily make them smaller.
A week ago I decided that I was tired of drawing with a mouse, so I decided that I was going to get a graphics tablet. After much browsing online I finally found one I liked:
The Wacom Bamboo Capture looked like the perfect mix of functionality and price - I promptly picked one up from my local big-box electronics store.

I must say that using a tablet is not only more intuitive than using a mouse, but it's also quite faster.
The software I use to author my textures - GIMP - conveniently supports tablets, and the 3d modeler I use  - Blender - surprisingly does as well.

All in all I must say that a graphics tablet was a wise investment, I can now easily pump out up-to 6 completely new textures a day. That's three times faster than with a mouse, and I must also say that my images also look better as a result.

Some of the textures I've made in GIMP, rendered in Blender.
Can you tell what game I'm using for inspiration?

Monday, July 23, 2012

Finally a level editor!

Well it took a bit of time, but it's finally in working order! To elaborate a bit further, here's a list of things that are now possible in the Portal debug mode:

  • Load levels from Ruined Level Portal files (*.rlp)
  • Switch to portal editor mode - I edit individual portals at a time
  • Select just about any object in the level, and edit its properties with the Property-grid control and my "gizmo" control
  •  Load new models and collision meshes while the game is running
  • Save portals into *rlp format

To make loading, and saving levels possible, I had a couple of options.

  1. Use reflection to process and load the level data to and from XML files
  2. Use reflection to process and load the level data to and from "binary" files
  3. Write my own format, importer and processor
I went with option number 3, for a couple of reasons:
  • I could make my format as size efficient as possible ( I'm using bits, bytes, and uint16's)
  • I could store just enough data ,as opposed to too much junk
  • I could store what I wanted and know where to find it in the file
  • XNA makes writing importers and processors REALLY easy
  • I just like the flexibility
Now my format may not have the readability of XML, but it is sure a LOT more readable than XNA's binary-serializer. If someone needed to, they could parse through the level files by hand and make changes - with the right documentation of course.
Here's a little bit of the level parser to give you an idea of what I mean:
ushort Type = input.ReadUInt16();
if (Type == 0x0000) // Torch
     portal.DynamicObjects.Add(new Engine.DynamicObjects.Torch(input.ReadVector3(), input.ReadSingle(), portal, input.ReadBoolean()));
else if (Type == 1)
{
     // Door
}
else if (Type == 0x0002) // Ladder
     portal.DynamicObjects.Add(new Engine.DynamicObjects.Ladder(input.ReadVector3(), input.ReadSingle(), input.ReadSingle()));
else if (Type == 0x0003) // Chest
     portal.DynamicObjects.Add(new Engine.DynamicObjects.Chest(input.ReadVector3(), input.ReadSingle(), Index, input.ReadUInt16(), input.ReadUInt16()));

So as you can see, I'm only reading the data used to initialize the torch, I don't need to store all the other fluff XNA's-serializers store - and I'm not talking about the stuff you can mark to ignore.
For example: things like strings can be stored as a char[] instead of 2 bytes per letter, or if i had an object that contains both a model and a collision mesh, I can have an unique type saying, "Hey, this object's model and collision mesh are the same, I don't have to store the file name twice."

Enough talk for now though, here are some pictures of the level editor in action-
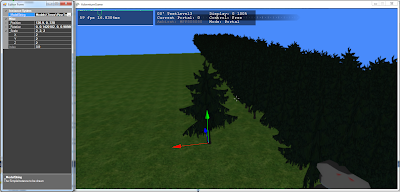


I can even edit instanced-objects individually!


Friday, July 6, 2012

Trees and God Rays

Yep, another one of those posts where the title summarizes its content.
So, as far as eye-candy goes, Ruined should more than fill ones appetite - at least for an indie game.

First up it's:
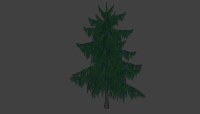
Dynamic Trees - the kind with leaves.
  • You heard right, trees will appear to blow and sway in the wind. 
  • I'm also using hardware instancing for drawing trees/bushes/grass, so I should be able to have a considerable amount of vegetation on the screen at once. 
  • Trees are pretty awesome...


Followed by:
God Rays a.k.a. Light Shafts
  • God rays create the effect of sun-rays shining around sun-occluding objects.
  • In other words, it's nothing but eye candy, but delicious eye candy at that!


A word on implementation
God-rays are actually really easy to program.
  1. Draw the sky, masked by the environment into a TINY render-target (you can use your depth buffer for this)
  2. Radially blur this image into another TINY render-target, using the sun-screen-space position
  3. Additively blend the blurred image with your final output.
Here are some links where you can find out more on programming god-rays
  1. Your model needs to have certain values painted to each of it's vertices
  2. In the vertex shader you transform each vertices position taking into account it's vertex color
  3. Blender doesn't support painting a single channel of a vertex color at a time (ie Red, Green, or Blue), so a processor must be written to combine three separate vertex color channels into one. So you have to make a channel for Reds, a channel for Greens, and a channel for Blues, then you combine all three of these channels into one.
  4. I then wrote my own simple model format to allow me to hardware instance with ease
Again, here are some links that have some more information on the topic

Note: The tree model used in this post is provided as free-ware from the Loopix-Project in its original form.


Night Sky

Well, this post will be a quick one.
As the title implies, I have a working night sky, complete with stars clouds and a moon!


Oooooh! The Red moon.

Tuesday, June 26, 2012

Sky

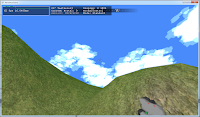
So, considering the last post, Terrain, one of the other constantly visible things in a game is the sky. Whether  you're just getting a glimpse of it as you fight off some monsters or flying through it, the sky can be equally important as any other part visual part of a game. so of course I've gone ahead and started work on the sky system for Ruined. I wanted to follow the art style of the game, so I stuck with a stylized design.
The sky is still "under construction," but I feel like a good portion of it is working


The clouds follow the stylized theme of the game,
and move dynamically over time


Friday, June 22, 2012

Terrain

One of the most important things in a game can easily be its terrain. The scale, the detail and the atmosphere it creates easily make a good terrain system a must.

So of course I've begun work on a terrain system, nothing fancy yet, I've only invested 2 days in it so far, but I'm pretty pleased with the results.

I've created a terrain editor, built right into the engine.
Features include:

  • Loading/Saving of a height-map
  • Physics, dynamic lighting... - all the features of the engine
  • Texture splatting
  • Raise, lower and smooth tools
  • The ability to paint terrain from right in the game!
I still need to look at some optimization techniques so I can be sure it runs flawlessly on the Xbox, but for now here's some screen-shots of the editor.

The terrain editor doing its thing.
Green = Raise; Red = Lower; Blue = Smooth; White = Texture Paint

Tuesday, June 19, 2012

Back and ready for action

So as the title says, I'm back! "From where?" you may ask;
I had had finals and afterward was taking a quick brake/vacation for the summer, but I assure you I'm ready to get back to work now.

A few new features have been added that still need to be tweaked before I can show them off, namely a couple of render-specific adjustments. All will be revealed shortly...

Thursday, May 10, 2012

Nav-Mesh Editor Part-3

Okay, making more progress on nav-meshes!
New features:
  • Polygon Select Mode
  • Automatic neighbor calculating
  • Path finding preview
  • Nav-Mesh file format ( *.rnm)
I made some more additions to the editor, mostly to make creating these meshes easier. I had to do all the work associated with making a model editor, except my "polygons" can have up to 15 sides ( expandable to 18). All of the navigation data is stored in the one of  the most memory-efficient way possible IMO.

I also got around to making a file-format to store the navigation-meshes in! I call it "Ruined Navigation Mesh" format - original and ironic I know. These files are also VERY size efficient.
For all of you out there familiar with XNA, I've written my own importer and processor...

Ruined-Navigation-Mesh-Format:

Offset
Description
Size
0x00
Header "rNavMesh"
8 bytes
0x08
Number of Vertices (v)
2 bytes (ushort)
0x0A
Number of Polygons (p)
2 bytes (ushort)
0x0C
Vertices
12 bytes (float3) * p
0x0C * v * 12
Polygons -
xp vertices ( ushort[] )
yp neighbors ( ushort[] )
Sp = Sp-1 + 4 + xp + yp

Data stored in memory as a single ushort[]

One of the great things about just reading data directly from the file is that XNA can compress *.rnm files automatically!

So in other words, all that's left to do with this is to actually make the meshes, and program some AI to use them :P

Path-finding, Initial Polygons 
Path-finding, Found Path 


Note : Polygons are stored as a single ushort[] in memory, the actual polygon's data is extracted from this array (Yay! bit-wize Shifts)

Sunday, April 29, 2012

Nav-Mesh Editor Part-2

So, as usual I have very little time to work; the time I am getting though, I am using to make sure I can better use my time.
Hence why I've spent more time on the nav-mesh editor.

Additions:

  • A translation tool (similar to most 3d editors).
  • Polygon highlighting.
  • Usability tweaks.

Anyways here are some pics to show what I'm talking about:

The navigation-mesh mesh editor.


Sunday, April 22, 2012

Nav-Mesh Editor

So as I mentioned in the previous post, making navigation meshes on pieces of paper is a pain. So I've created an editor that runs right within the game.
Don't worry, this won't show up while you're playing :)

Anyways, I can now make the nav-meshes much more easily, which should help speed up level creation!

What works:
  • Multi-selection of vertices
  • Keyboard based tranforms
  • Adding new vertices
  • The display of vertices (boxes)
  • The mesh visual, cyan outline of polygons

What's still missing:
  • Selecting polygons
  • Creating new polygons

So hopefully, when those last few features are added, I can create and test out a level that implements the navigation system...


Friday, April 13, 2012

Navigation

So, I've reached the awfully wonderful part of a game's development, where you have weapons programmed and tested, but now, you are just dying to get something to hit in your game.
This means AI is coming up fast!

Okay, so almost any game with an AI system needs to implement some sort of navigation system.

And that's what I've been working on for the past few days.
I have created a Navigation Mesh system for Ruined, that's powered by the A* ( A-Star ) navigation algorithm


You can read up on what exactly a Navigation Mesh is at any of these links:
Then you can learn about A* and its implantation at any of these:

Anyways, the gist of this all is that the monsters and enemies in Ruined should be smart enough to find you and KILL you, no matter where you hide :P

The test navigation mesh, with a test path. Red = path

The test mesh was created by hand, on a piece of graph paper.
The test path is from cells A to P.
So, I still need to devise a way to actually make these Navigation Meshes, because doing them all on paper would be RIDICULOUS, but for the most part, I've managed to get one step closer to finishing the game!

Sunday, April 8, 2012

Sword Detection Progress

Making some awesome progress! I've gotten to the point where objects can be programmed to react when a weapon hits them. So things like monsters should be quite simple to make now. The "Hit-able" objects are represented with a bunch of spheres, inside of one big sphere. When the player swings a weapon, the engine does a ray-test to determine if the weapon hits the big sphere, and if so, checks to see if it hits one of the smaller spheres that make up a model.

In other words, you actually have to "hit" an object for the game to think you've hit something!

A smaller sphere in a test-torch

Hitting the torch, lights it!

A view of some of the collision bounds. Red = obstacle, Blue = big sphere check, Green = small sphere check

A better view of some "big-spheres"

Friday, April 6, 2012

Sword Detection

Okay, so the sword system is all good to go! I've made the other two sword swing animations and they work AMAZINGLY.
I even managed to get the sword detection down. The detection actually uses the position of the sword.  Currently the sword only collides with the level geometry because there is nothing to attack; hopefully I'll fix that soon, though.

Green line is the current sword collision line, red line is the last sword position.

Green is current sword position, yellow is previous position and red is a previous hit.

Thursday, April 5, 2012

Sword Swinging

Finally! After four months I have an actual weapon being drawn in the game.
I have done one of the three types of sword "attack", I'll make the others shortly, I'll get a texture made while I'm at it!


Wednesday, April 4, 2012

First Person Progress

So tomorrow starts my spring-vacation, so I can hopefully get some serious work done!
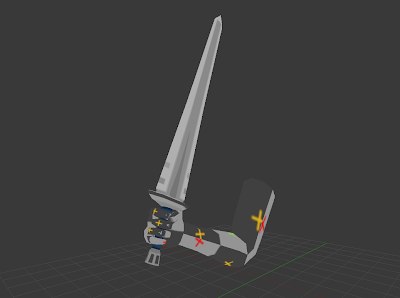
I have already started to make the "first person" models that will be used in the game. My plan is to use a stream-animation system to allow some dynamic movement of the characters arms. Currently, I have the right arm modeled and rigged, and making the left arm will be a flipped copy.
All that's left before getting it in the game are its textures and some animating.
Hopefully once I have the arms done, I can work on some of the awesome weapons I have planned!

The right arm holding a sword.

A view of the arm's rig.